Linking and Navigating
In Next.js, routes are rendered on the server by default. This often means the client has to wait for a server response before a new route can be shown. Next.js comes with built-in prefetching, streaming, and client-side transitions ensuring navigation stays fast and responsive.
This guide explains how navigation works in Next.js and how you can optimize it for dynamic routes and slow networks.
How navigation works
To understand how navigation works in Next.js, it helps to be familiar with the following concepts:
Server Rendering
In Next.js, Layouts and Pages are React Server Components by default. On initial and subsequent navigations, the Server Component Payload is generated on the server before being sent to the client.
There are two types of server rendering, based on when it happens:
- Static Rendering (or Prerendering) happens at build time or during revalidation and the result is cached.
- Dynamic Rendering happens at request time in response to a client request.
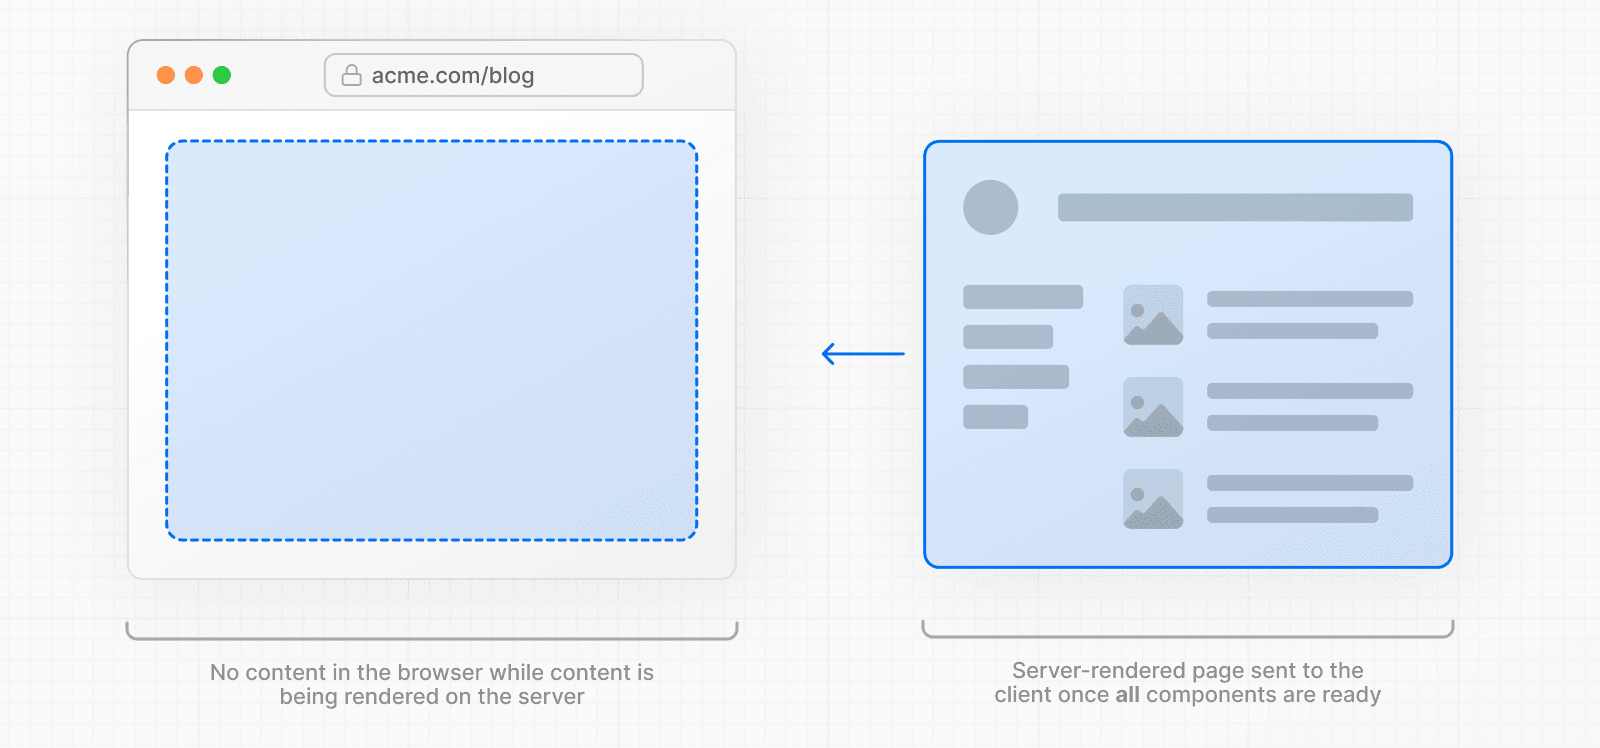
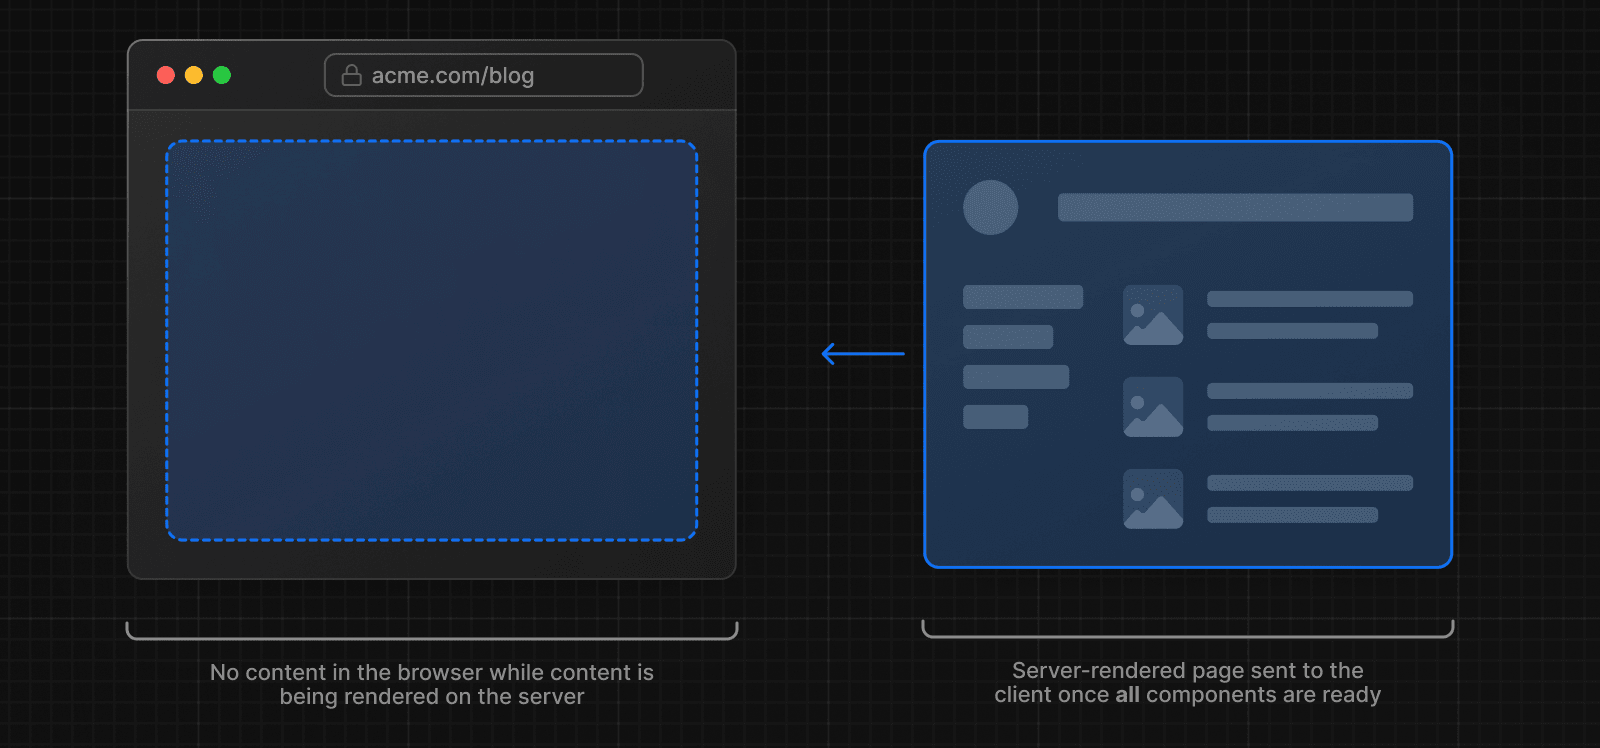
The trade-off of server rendering is that the client must wait for the server to respond before the new route can be shown. Next.js addresses this delay by prefetching routes the user is likely to visit and performing client-side transitions.
Good to know: HTML is also generated for the initial visit.
Prefetching
Prefetching is the process of loading a route in the background before the user navigates to it. This makes navigation between routes in your application feel instant, because by the time a user clicks on a link, the data to render the next route is already available client side.
Next.js automatically prefetches routes linked with the <Link> component when they enter the user's viewport.
import Link from 'next/link'

export default function Layout({ children }: { children: React.ReactNode }) {
  return (
    <html>
      <body>
        <nav>
          {/* Prefetched when the link is hovered or enters the viewport */}
          <Link href="/blog">Blog</Link>
          {/* No prefetching */}
          <a href="/contact">Contact</a>
        </nav>
        {children}
      </body>
    </html>
  )
}
How much of the route is prefetched depends on whether it's static or dynamic:
- Static Route: the full route is prefetched.
- Dynamic Route: prefetching is skipped, or the route is partially prefetched if
loading.tsxis present.
By skipping or partially prefetching dynamic routes, Next.js avoids unnecessary work on the server for routes the users may never visit. However, waiting for a server response before navigation can give the users the impression that the app is not responding.

To improve the navigation experience to dynamic routes, you can use streaming.
Streaming
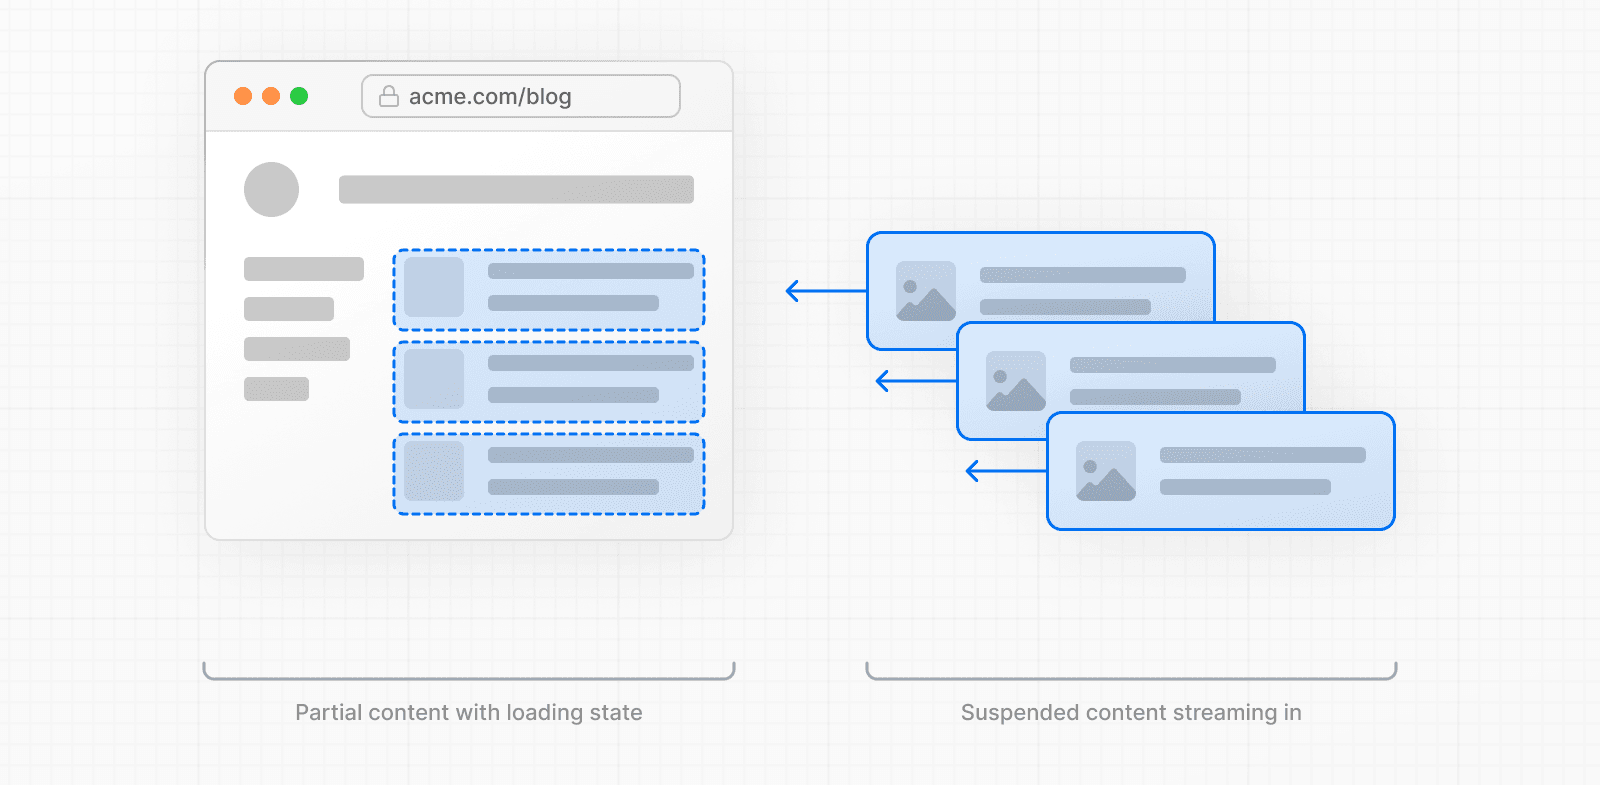
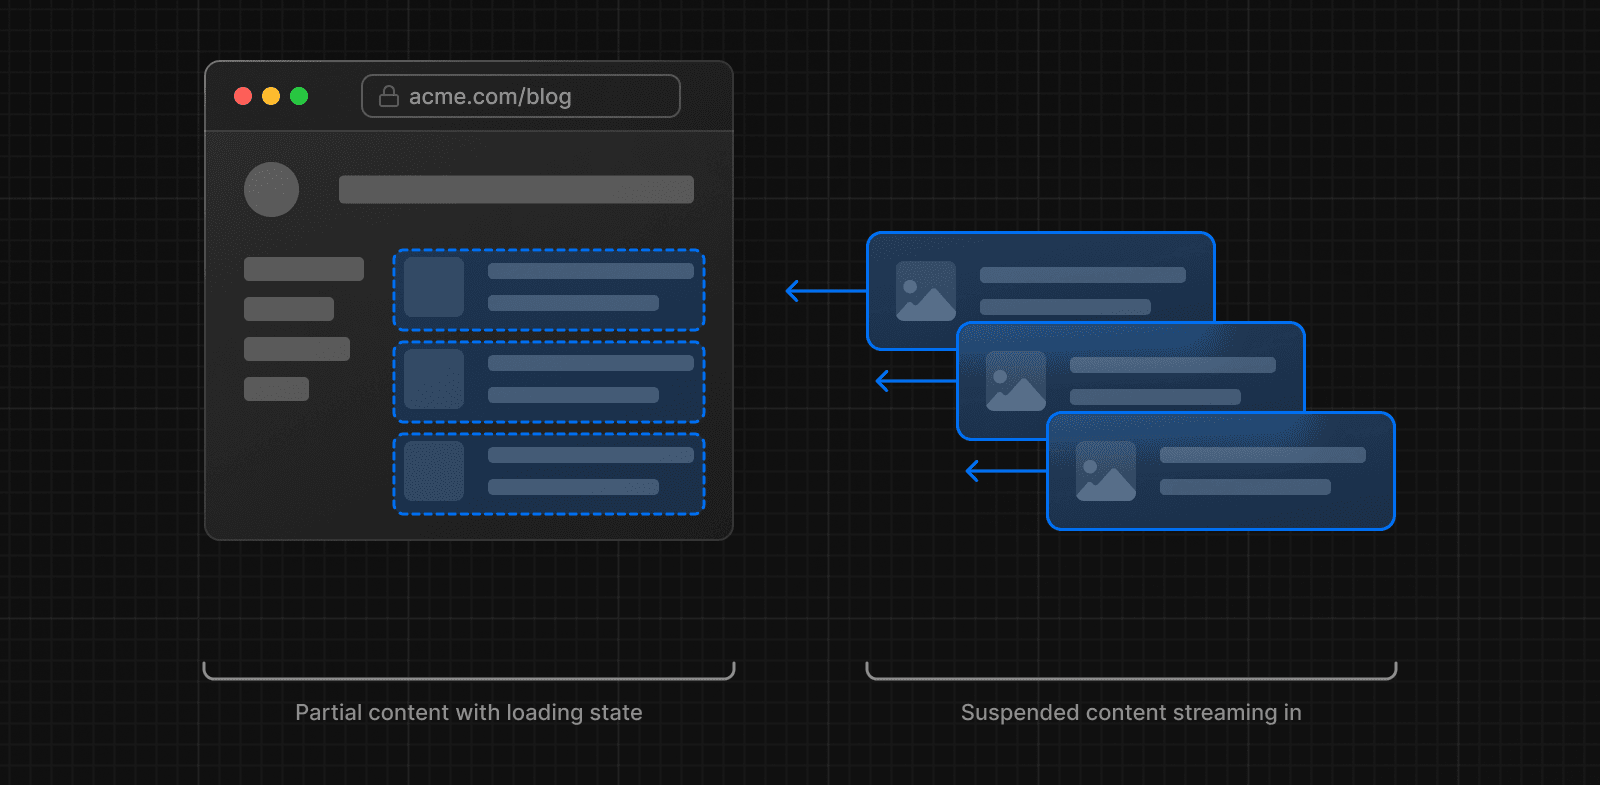
Streaming allows the server to send parts of a dynamic route to the client as soon as they're ready, rather than waiting for the entire route to be rendered. This means users see something sooner, even if parts of the page are still loading.
For dynamic routes, it means they can be partially prefetched. That is, shared layouts and loading skeletons can be requested ahead of time.

To use streaming, create a loading.tsx in your route folder:

export default function Loading() {
  // Add fallback UI that will be shown while the route is loading.
  return <LoadingSkeleton />
}
Behind the scenes, Next.js will automatically wrap the page.tsx contents in a <Suspense> boundary. The prefetched fallback UI will be shown while the route is loading, and swapped for the actual content once ready.
Good to know: You can also use
<Suspense>to create loading UI for nested components.
Benefits of loading.tsx:
- Immediate navigation and visual feedback for the user.
- Shared layouts remain interactive and navigation is interruptible.
- Improved Core Web Vitals: TTFB, FCP, and TTI.
To further improve the navigation experience, Next.js performs a client-side transition with the <Link> component.
Client-side transitions
Traditionally, navigation to a server-rendered page triggers a full page load. This clears state, resets scroll position, and blocks interactivity.
Next.js avoids this with client-side transitions using the <Link> component. Instead of reloading the page, it updates the content dynamically by:
- Keeping any shared layouts and UI.
- Replacing the current page with the prefetched loading state or a new page if available.
Client-side transitions are what makes a server-rendered apps feel like client-rendered apps. And when paired with prefetching and streaming, it enables fast transitions, even for dynamic routes.
What can make transitions slow?
These Next.js optimizations make navigation fast and responsive. However, under certain conditions, transitions can still feel slow. Here are some common causes and how to improve the user experience:
Dynamic routes without loading.tsx
When navigating to a dynamic route, the client must wait for the server response before showing the result. This can give the users the impression that the app is not responding.
We recommend adding loading.tsx to dynamic routes to enable partial prefetching, trigger immediate navigation, and display a loading UI while the route renders.
export default function Loading() {
  return <LoadingSkeleton />
}
Good to know: In development mode, you can use the Next.js Devtools to identify if the route is static or dynamic. See
devIndicatorsfor more information.
Dynamic segments without generateStaticParams
If a dynamic segment could be prerendered but isn't because it's missing generateStaticParams, the route will fallback to dynamic rendering at request time.
Ensure the route is statically generated at build time by adding generateStaticParams:
export async function generateStaticParams() {
  const posts = await fetch('https://.../posts').then((res) => res.json())

  return posts.map((post) => ({
    slug: post.slug,
  }))
}

export default async function Page({
  params,
}: {
  params: Promise<{ slug: string }>
}) {
  const { slug } = await params
  // ...
}
Slow networks
On slow or unstable networks, prefetching may not finish before the user clicks a link. This can affect both static and dynamic routes. In these cases, the loading.js fallback may not appear immediately because it hasn't been prefetched yet.
To improve perceived performance, you can use the useLinkStatus hook to show immediate feedback while the transition is in progress.
'use client'

import { useLinkStatus } from 'next/link'

export default function LoadingIndicator() {
  const { pending } = useLinkStatus()
  return (
    <span aria-hidden className={`link-hint ${pending ? 'is-pending' : ''}`} />
  )
}
You can "debounce" the hint by adding an initial animation delay (e.g. 100ms) and starting as invisible (e.g. opacity: 0). This means the loading indicator will only be shown if the navigation takes longer than the specified delay. See the useLinkStatus reference for a CSS example.
Good to know: You can use other visual feedback patterns like a progress bar. View an example here.
Disabling prefetching
You can opt out of prefetching by setting the prefetch prop to false on the <Link> component. This is useful to avoid unnecessary usage of resources when rendering large lists of links (e.g. an infinite scroll table).
<Link prefetch={false} href="/blog">
  Blog
</Link>
However, disabling prefetching comes with trade-offs:
- Static routes will only be fetched when the user clicks the link.
- Dynamic routes will need to be rendered on the server first before the client can navigate to it.
To reduce resource usage without fully disabling prefetch, you can prefetch only on hover. This limits prefetching to routes the user is more likely to visit, rather than all links in the viewport.
'use client'

import Link from 'next/link'
import { useState } from 'react'

function HoverPrefetchLink({
  href,
  children,
}: {
  href: string
  children: React.ReactNode
}) {
  const [active, setActive] = useState(false)

  return (
    <Link
      href={href}
      prefetch={active ? null : false}
      onMouseEnter={() => setActive(true)}
    >
      {children}
    </Link>
  )
}
Hydration not completed
<Link> is a Client Component and must be hydrated before it can prefetch routes. On the initial visit, large JavaScript bundles can delay hydration, preventing prefetching from starting right away.
React mitigates this with Selective Hydration and you can further improve this by:
- Using the
@next/bundle-analyzerplugin to identify and reduce bundle size by removing large dependencies. - Moving logic from the client to the server where possible. See the Server and Client Components docs for guidance.
Examples
Native History API
Next.js allows you to use the native window.history.pushState and window.history.replaceState methods to update the browser's history stack without reloading the page.
pushState and replaceState calls integrate into the Next.js Router, allowing you to sync with usePathname and useSearchParams.
window.history.pushState
Use it to add a new entry to the browser's history stack. The user can navigate back to the previous state. For example, to sort a list of products:
'use client'

import { useSearchParams } from 'next/navigation'

export default function SortProducts() {
  const searchParams = useSearchParams()

  function updateSorting(sortOrder: string) {
    const params = new URLSearchParams(searchParams.toString())
    params.set('sort', sortOrder)
    window.history.pushState(null, '', `?${params.toString()}`)
  }

  return (
    <>
      <button onClick={() => updateSorting('asc')}>Sort Ascending</button>
      <button onClick={() => updateSorting('desc')}>Sort Descending</button>
    </>
  )
}
window.history.replaceState
Use it to replace the current entry on the browser's history stack. The user is not able to navigate back to the previous state. For example, to switch the application's locale:
'use client'

import { usePathname } from 'next/navigation'

export function LocaleSwitcher() {
  const pathname = usePathname()

  function switchLocale(locale: string) {
    // e.g. '/en/about' or '/fr/contact'
    const newPath = `/${locale}${pathname}`
    window.history.replaceState(null, '', newPath)
  }

  return (
    <>
      <button onClick={() => switchLocale('en')}>English</button>
      <button onClick={() => switchLocale('fr')}>French</button>
    </>
  )
}Was this helpful?


