)
}
```
#### Checking Active Links
You can use [`usePathname()`](/docs/app/api-reference/functions/use-pathname) to determine if a link is active. For example, to add a class to the active link, you can check if the current `pathname` matches the `href` of the link:
```tsx title="app/components/links.tsx"
'use client'
import { usePathname } from 'next/navigation'
import Link from 'next/link'
export function Links() {
const pathname = usePathname()
return (
)
}
```
```jsx title="app/components/links.js"
'use client'
import { usePathname } from 'next/navigation'
import Link from 'next/link'
export function Links() {
const pathname = usePathname()
return (
)
}
```
#### Scrolling to an `id`
The default behavior of the Next.js App Router is to scroll to the top of a new route or to maintain the scroll position for backwards and forwards navigation.
If you'd like to scroll to a specific `id` on navigation, you can append your URL with a `#` hash link or just pass a hash link to the `href` prop. This is possible since `` renders to an `` element.
```jsx
Settings
// Output
Settings
```
#### Disabling scroll restoration
The default behavior of the Next.js App Router is to scroll to the top of a new route or to maintain the scroll position for backwards and forwards navigation. If you'd like to disable this behavior, you can pass `scroll={false}` to the `` component, or `scroll: false` to `router.push()` or `router.replace()`.
```jsx
// next/link
Dashboard
```
```jsx
// useRouter
import { useRouter } from 'next/navigation'
const router = useRouter()
router.push('/dashboard', { scroll: false })
```
## `useRouter()` Hook
The `useRouter` hook allows you to programmatically change routes.
This hook can only be used inside Client Components and is imported from `next/navigation`.
```jsx title="app/page.js"
'use client'
import { useRouter } from 'next/navigation'
export default function Page() {
const router = useRouter()
return (
)
}
```
For a full list of `useRouter` methods, see the [API reference](/docs/app/api-reference/functions/use-router).
> **Recommendation:**
>
> Use the `` component to navigate between routes unless you have a specific requirement for using `useRouter`.
## How Routing and Navigation Works
The App Router uses a hybrid approach for routing and navigation. On the server, your application code is automatically code-split by route segments. And on the client, Next.js [prefetches](#1-prefetching) and [caches](#2-caching) the route segments. This means, when a user navigates to a new route, the browser doesn't reload the page, and only the route segments that change re-render - improving the navigation experience and performance.
### 1. Prefetching
Prefetching is a way to preload a route in the background before the user visits it.
There are two ways routes are prefetched in Next.js:
- **`` component**: Routes are automatically prefetched as they become visible in the user's viewport. Prefetching happens when the page first loads or when it comes into view through scrolling.
- **`router.prefetch()`**: The `useRouter` hook can be used to prefetch routes programmatically.
The``'s prefetching behavior is different for static and dynamic routes:
- [**Static Routes**](/docs/app/building-your-application/rendering/server-components#static-rendering-default): `prefetch` defaults to `true`. The entire route is prefetched and cached.
- [**Dynamic Routes**](/docs/app/building-your-application/rendering/server-components#dynamic-rendering): `prefetch` default to automatic. Only the shared layout down until the first `loading.js` file is prefetched and cached for `30s`. This reduces the cost of fetching an entire dynamic route, and it means you can show an [instant loading state](/docs/app/building-your-application/routing/loading-ui-and-streaming#instant-loading-states) for better visual feedback to users.
You can disable prefetching by setting the `prefetch` prop to `false`.
See the [`` API reference](/docs/app/api-reference/components/link) for more information.
> **Good to know:**
>
> - Prefetching is not enabled in development, only in production.
### 2. Caching
Next.js has an **in-memory client-side cache** called the [Router Cache](/docs/app/building-your-application/data-fetching/fetching-caching-and-revalidating#caching-data#router-cache). As users navigate around the app, the React Server Component Payload of [prefetched](#1-prefetching) route segments and visited routes are stored in the cache.
This means on navigation, the cache is reused as much as possible, instead of making a new request to the server - improving performance by reducing the number of requests and data transferred.
Learn more about how the [Router Cache](/docs/app/building-your-application/data-fetching/fetching-caching-and-revalidating#caching-data) works and how to configure it.
### 3. Partial Rendering
Partial rendering means only the route segments that change on navigation re-render on the client, and any shared segments are preserved.
For example, when navigating between two sibling routes, `/dashboard/settings` and `/dashboard/analytics`, the `settings` and `analytics` pages will be rendered, and the shared `dashboard` layout will be preserved.
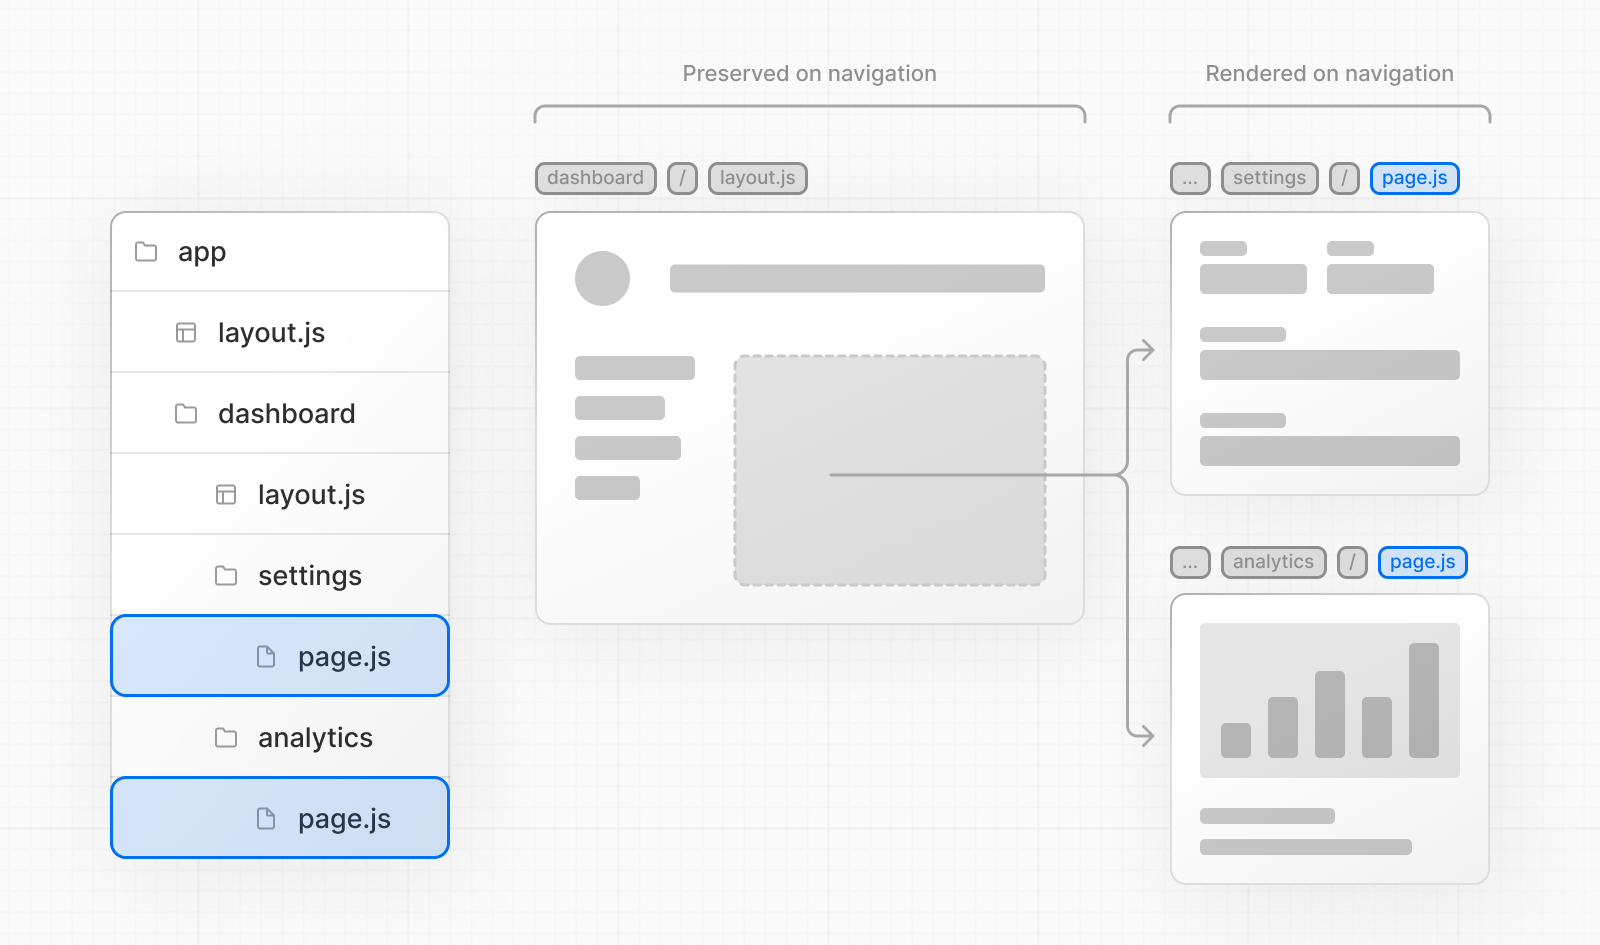
Without partial rendering, each navigation would cause the full page to re-render on the server. Rendering only the segment that changes reduces the amount of data transferred and execution time, leading to improved performance.
### 4. Soft Navigation
By default, the browser performs a hard navigation between pages. This means the browser reloads the page and resets React state such as `useState` hooks in your app and browser state such as the user's scroll position or focused element. However, in Next.js, the App Router uses soft navigation. This means React only renders the segments that have changed while preserving React and browser state, and there is no full page reload.
### 5. Back and Forward Navigation
By default, Next.js will maintain the scroll position for backwards and forwards navigation, and re-use route segments in the [Router Cache](/docs/app/building-your-application/data-fetching/fetching-caching-and-revalidating#caching-data).
- [Caching](/docs/13/app/building-your-application/caching): An overview of caching mechanisms in Next.js.
- [TypeScript](/docs/13/app/building-your-application/configuring/typescript): Next.js provides a TypeScript-first development experience for building your React application.
---
For a semantic overview of all documentation, see [/sitemap.md](/sitemap.md)
For an index of all available documentation, see [/docs/13/llms.txt](/docs/13/llms.txt)