10
Chapter 10
Server and Client Components
To understand how Server and Client Components work, it's helpful to be familiar with two foundational web concepts:
- The environments your application code can be executed in: the server and the client.
- The network boundary that separates server and client code.
Server and Client Environments
In the context of web applications:
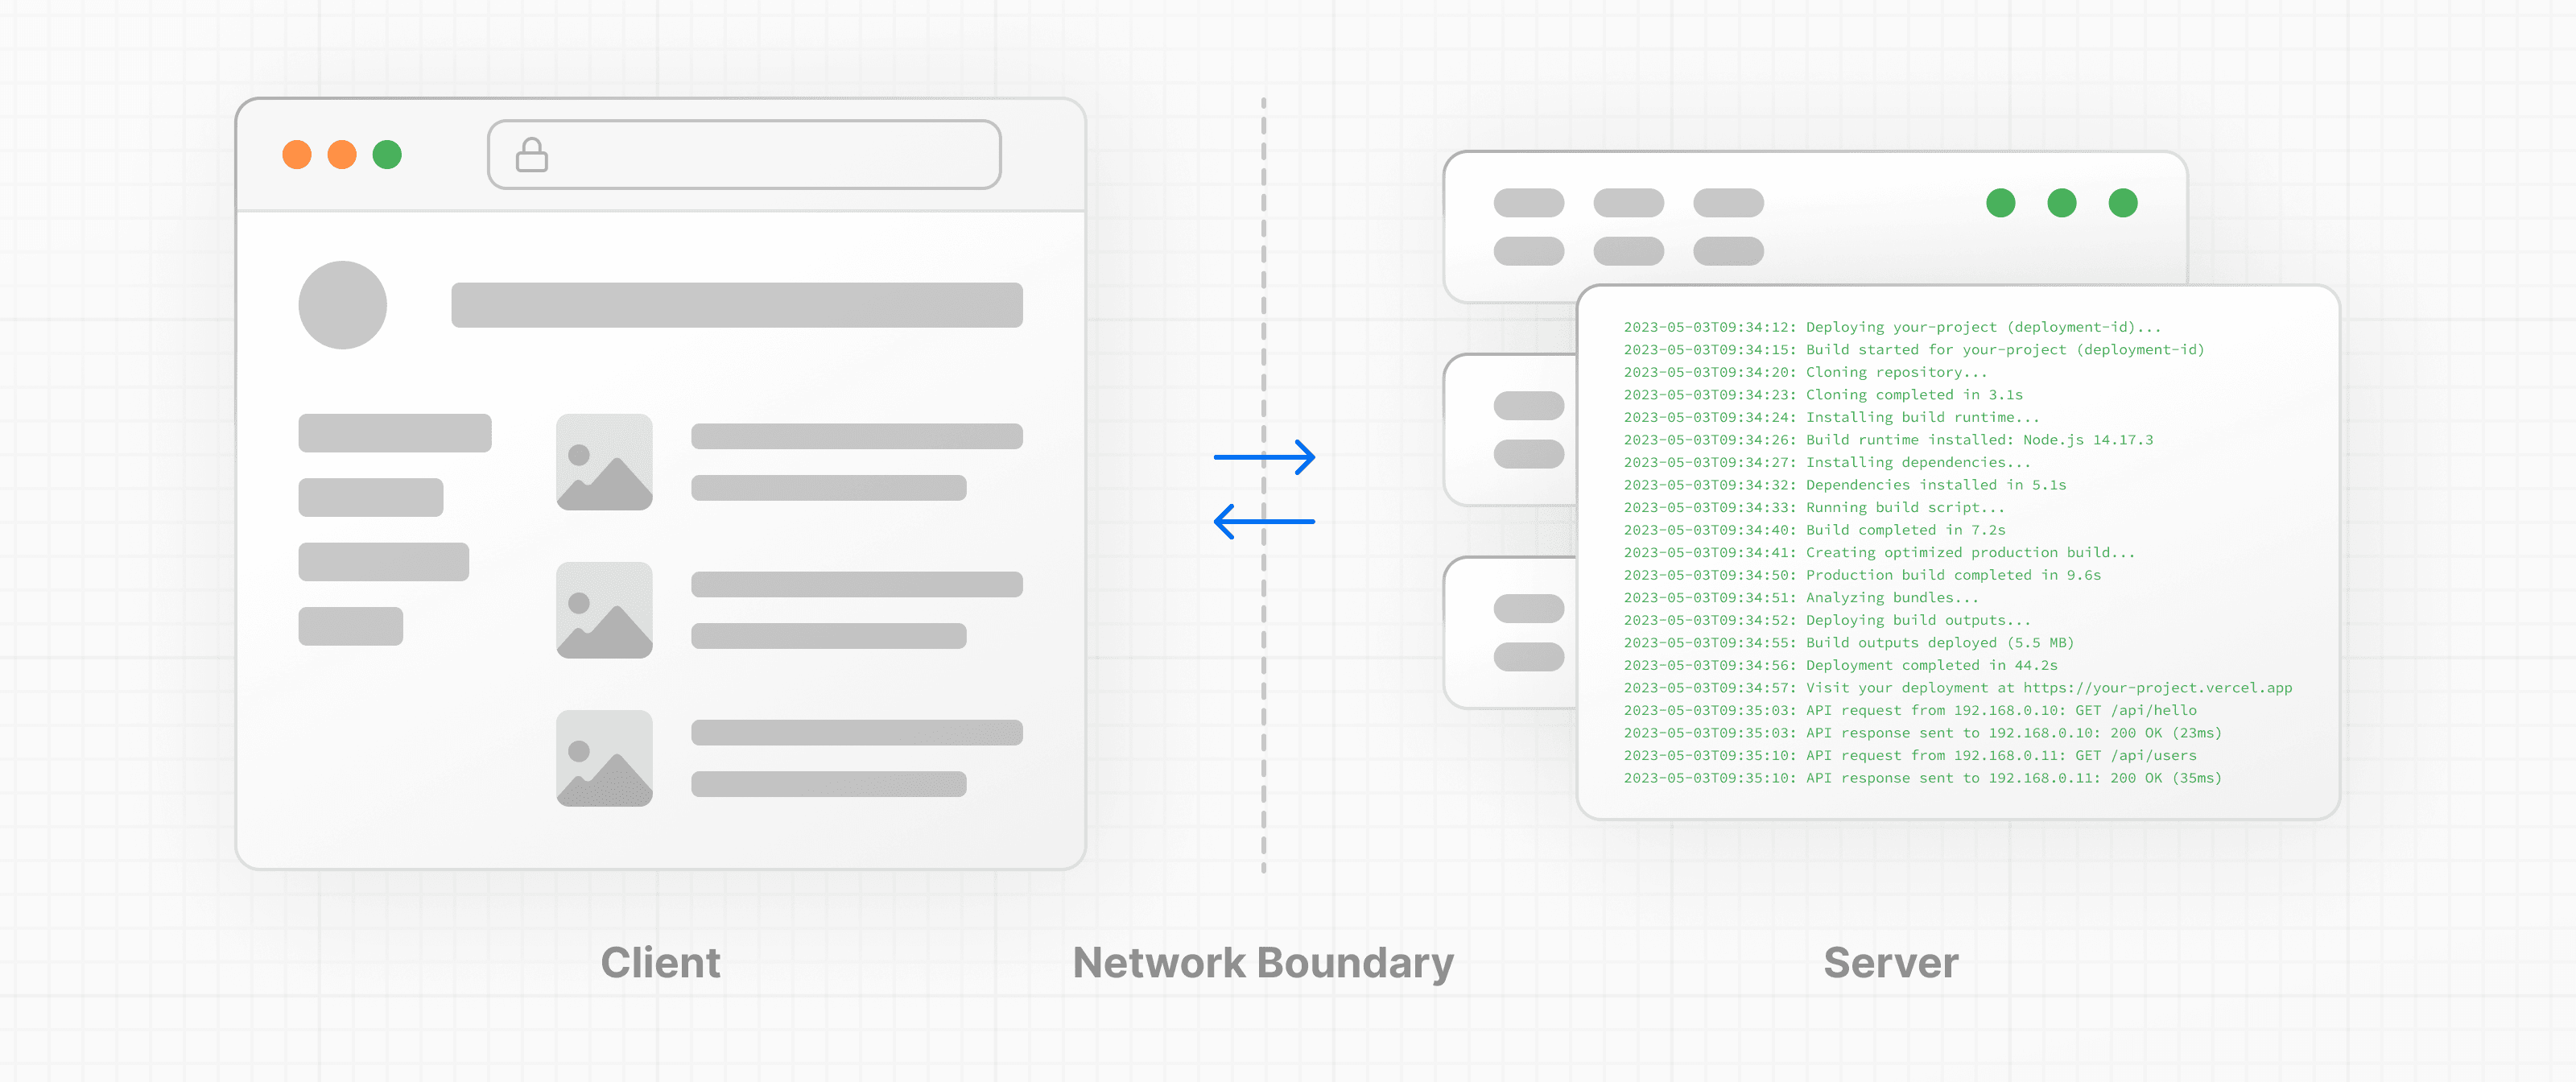

- The client refers to the browser on a user’s device that sends a request to a server for your application code. It then turns the response it receives from the server into an interface the user can interact with.
- The server refers to the computer in a data center that stores your application code, receives requests from a client, does some computation, and sends back an appropriate response.
Each environment has its own set of capabilities and constraints. For example, by moving rendering and data fetching to the server, you can reduce the amount of code sent to the client, which can improve your application's performance. But, as you learned earlier, to make your UI interactive, you need to update the DOM on the client.
Therefore, the code you write for the server and the client is not always the same. Certain operations (e.g. data fetching or managing user state) are better suited for one environment over the other.
Network Boundary
The Network Boundary is a conceptual line that separates the different environments.
In React, you choose where to place the network boundary in your component tree. For example, you can fetch data and render a user's posts on the server (using Server Components), then render the interactive LikeButton for each post on the client (using Client Components).
Similarly, you can create a Nav component that is rendered on the server and shared across pages, but if you want to show an active state for links, you can render the list of Links on the client.
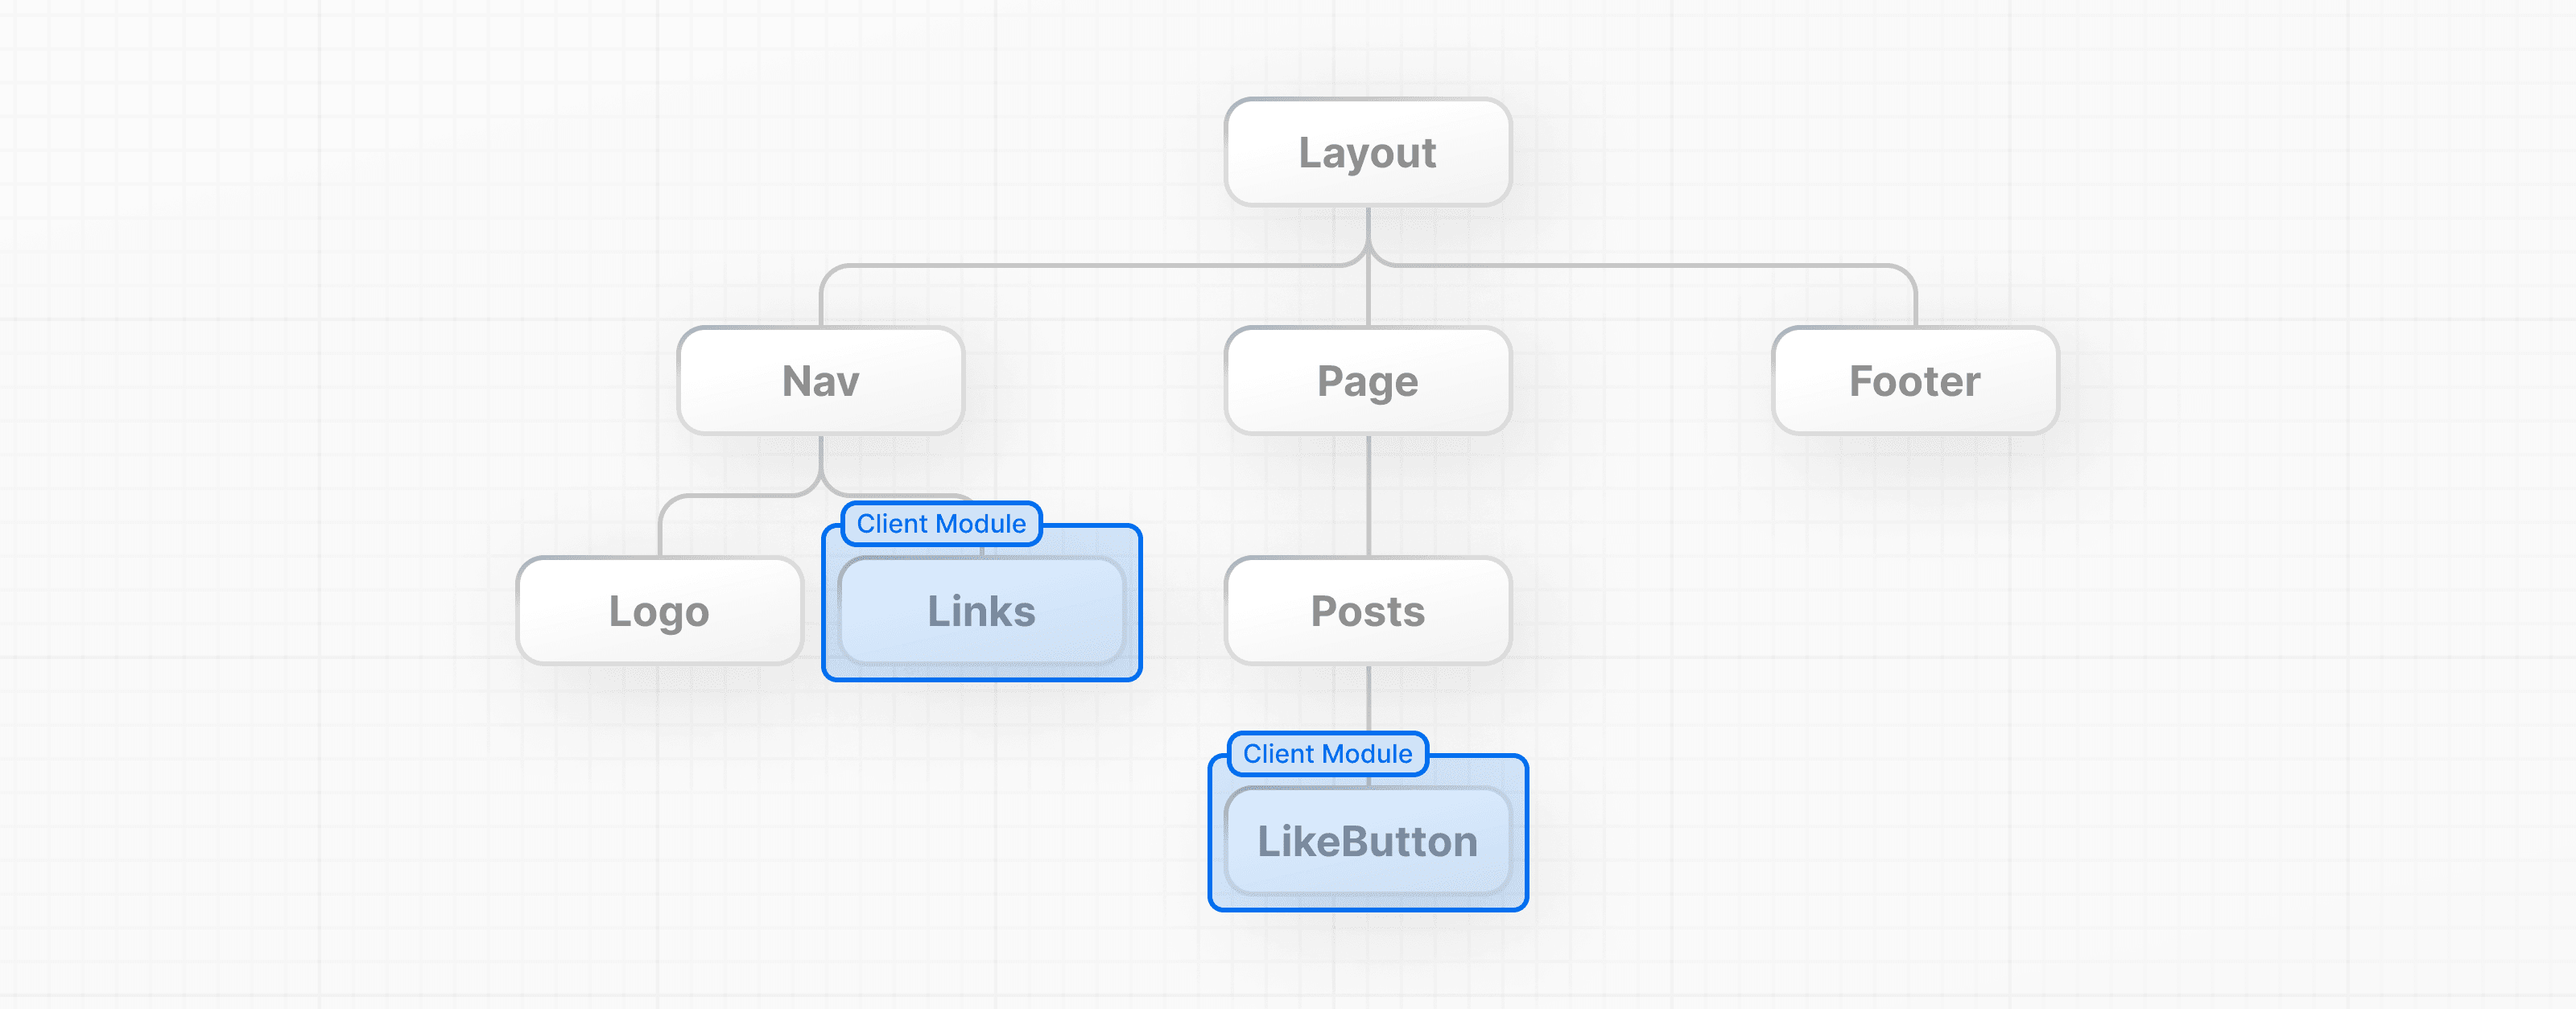

Behind the scenes, the components are split into two module graphs. The server module graph (or tree) contains all the Server Components that are rendered on the server, and the client module graph (or tree) contains all Client Components.
After Server Components are rendered, a special data format called the React Server Component Payload (RSC) is sent to the client. The RSC payload contains:
- The rendered result of Server Components.
- Placeholders (or holes) for where Client Components should be rendered and references to their JavaScript files.
React uses this information to consolidate the Server and Client Components and update the DOM on the client.
Let's see how this works.
Using Client Components
As you learned in the last chapter, Next.js uses Server Components by default - this is to improve your application's performance and means you don't have to take additional steps to adopt them.
Looking back at the error in your browser, Next.js is warning you that you're trying to useState inside a Server Component. You can fix this by moving the interactive "Like" button to a Client Component.
Create a new file called like-button.js inside the app folder that exports a LikeButton component:
export default function LikeButton() {}Move the <button> element and the handleClick() function from page.js to your new LikeButton component:
export default function LikeButton() {
  function handleClick() {
    setLikes(likes + 1);
  }

  return <button onClick={handleClick}>Like ({likes})</button>;
}
Next, move the likes state and the import:
import { useState } from 'react';

export default function LikeButton() {
  const [likes, setLikes] = useState(0);

  function handleClick() {
    setLikes(likes + 1);
  }

  return <button onClick={handleClick}>Like ({likes})</button>;
}
Now, to make the LikeButton a Client Component, add the React 'use client' directive at the top of the file. This tells React to render the component on the client.
'use client';

import { useState } from 'react';

export default function LikeButton() {
  const [likes, setLikes] = useState(0);

  function handleClick() {
    setLikes(likes + 1);
  }

  return <button onClick={handleClick}>Like ({likes})</button>;
}
Back in your page.js file, import the LikeButton component into your page:
import LikeButton from './like-button';

function Header({ title }) {
  return <h1>{title ? title : 'Default title'}</h1>;
}

export default function HomePage() {
  const names = ['Ada Lovelace', 'Grace Hopper', 'Margaret Hamilton'];

  return (
    <div>
      <Header title="Develop. Preview. Ship." />
      <ul>
        {names.map((name) => (
          <li key={name}>{name}</li>
        ))}
      </ul>
      <LikeButton />
    </div>
  );
}
Save both files and view your app in the browser. Now that there are no errors, once you make changes and save, you should notice the browser automatically updates to reflect the change.
This feature is called Fast Refresh. It gives you instantaneous feedback on any edits you make and comes pre-configured with Next.js.
Summary
To recap, you learned about the server and client environments and when to use each. You also learned that Next.js uses React Server Components by default to improve performance, and how you can opt into Client Components to smaller parts of your UI interactive.
Additional Reading
There's a lot more to learn about Server and Client Components. Here are some additional resources:
You've Completed Chapter 10
You've learned how to use Server and Client Components.
Was this helpful?