10
Chapter 10
Partial Prerendering
So far, you've learned about static and dynamic rendering, and how to stream dynamic content that depends on data. In this chapter, let's learn how to combine static rendering, dynamic rendering, and streaming in the same route with Partial Prerendering (PPR).
Partial Prerendering is an experimental feature introduced in Next.js 14. The content of this page may be updated as the feature progresses in stability. PPR is only available with the Next.js canary releases (
next@canary), not in the stable version of Next.js. We do not yet recommend using Partial Prerendering in production.
To install the canary release of Next.js, run:
pnpm install next@canaryIn this chapter...
Here are the topics we’ll cover
What Partial Prerendering is.
How Partial Prerendering works.
Static vs. Dynamic Routes
For most web apps built today, you either choose between static and dynamic rendering for your entire application, or for a specific route. And in Next.js, if you call a dynamic function in a route (like querying your database), the entire route becomes dynamic.
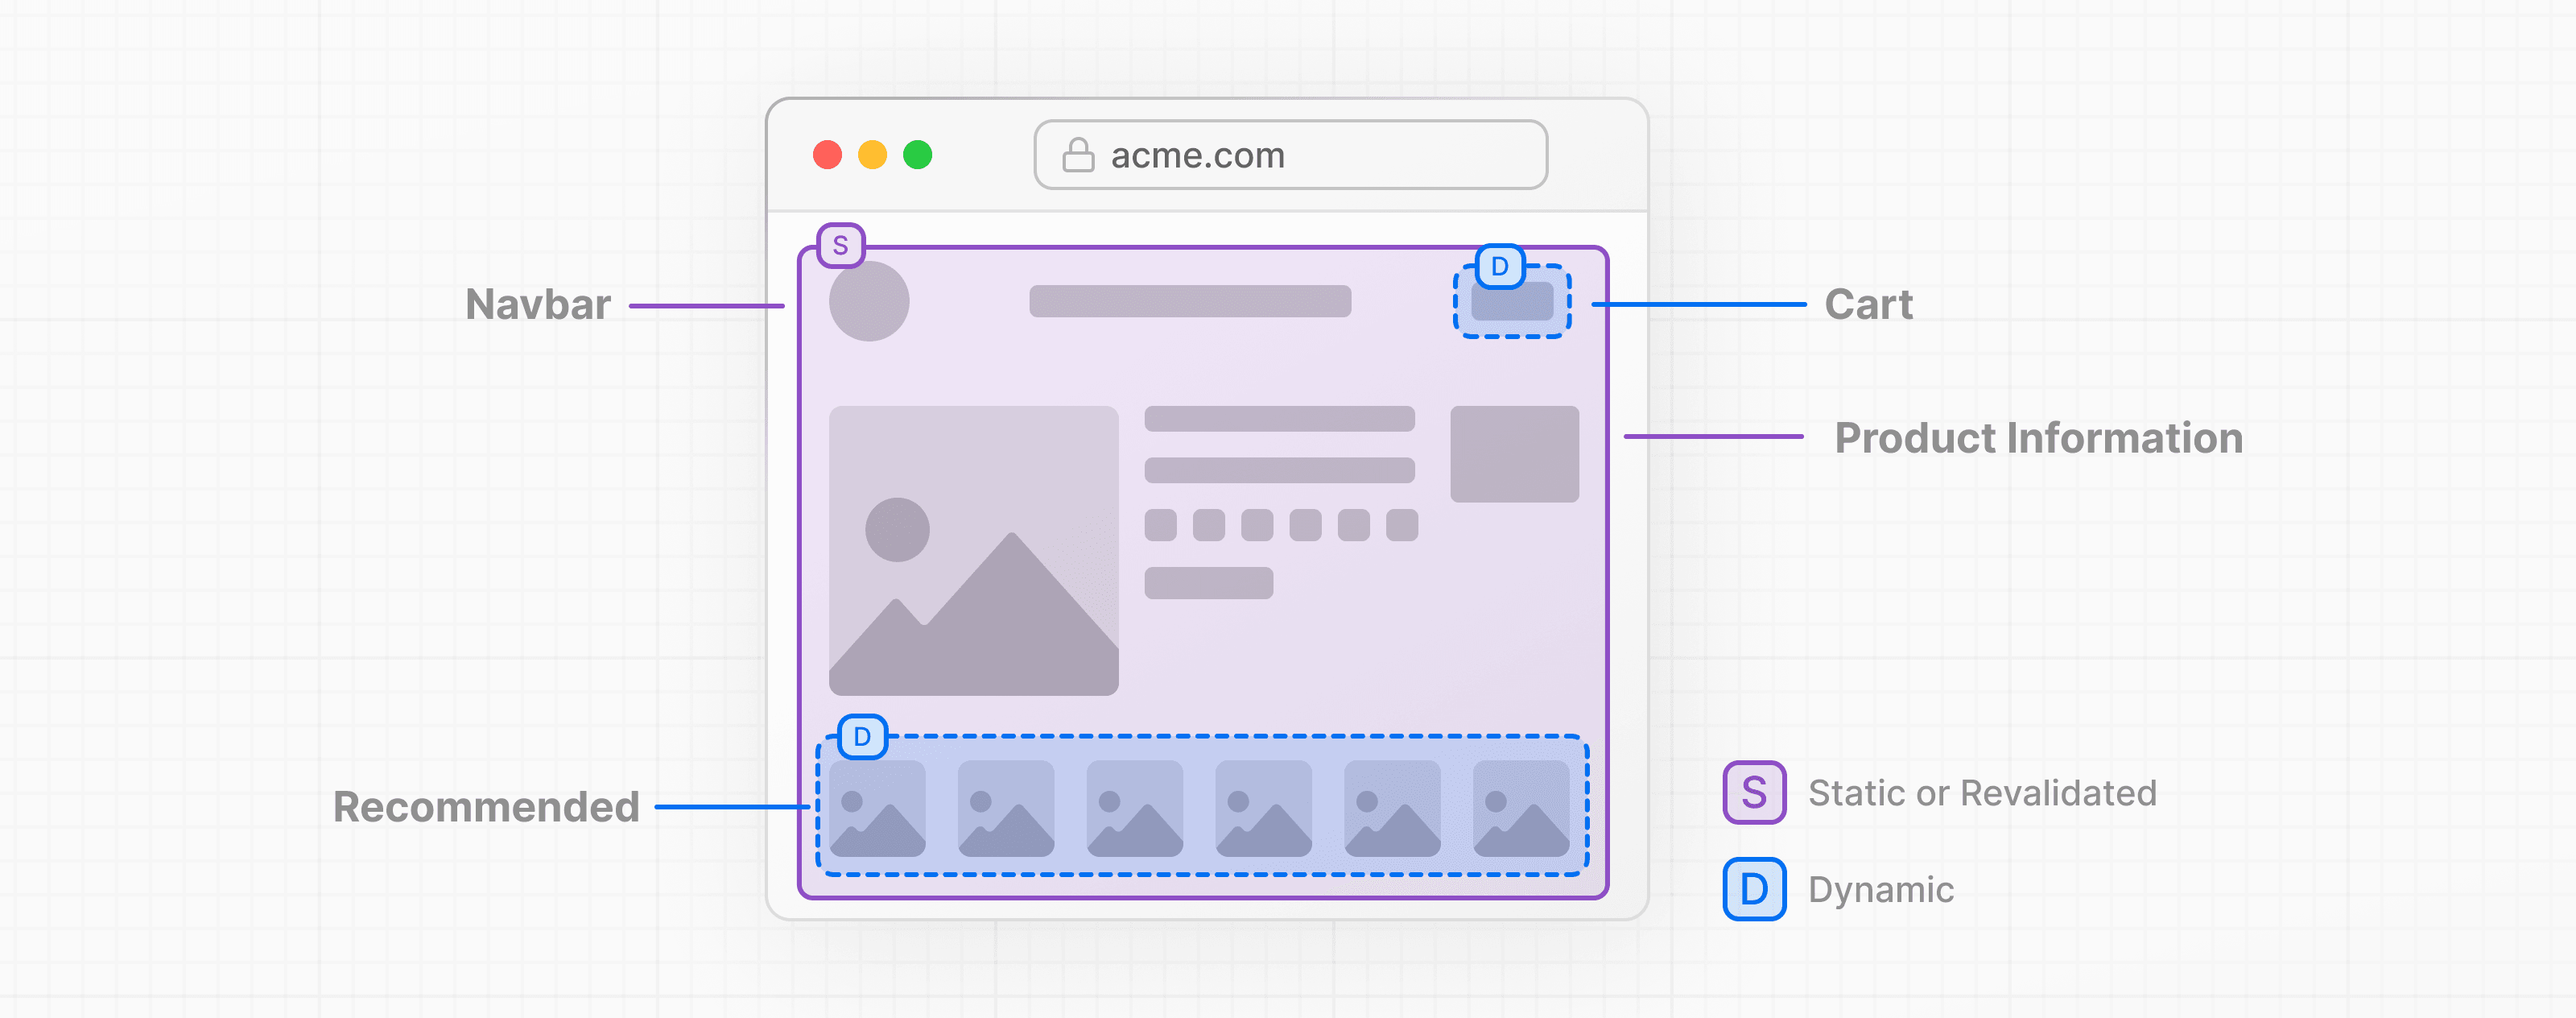
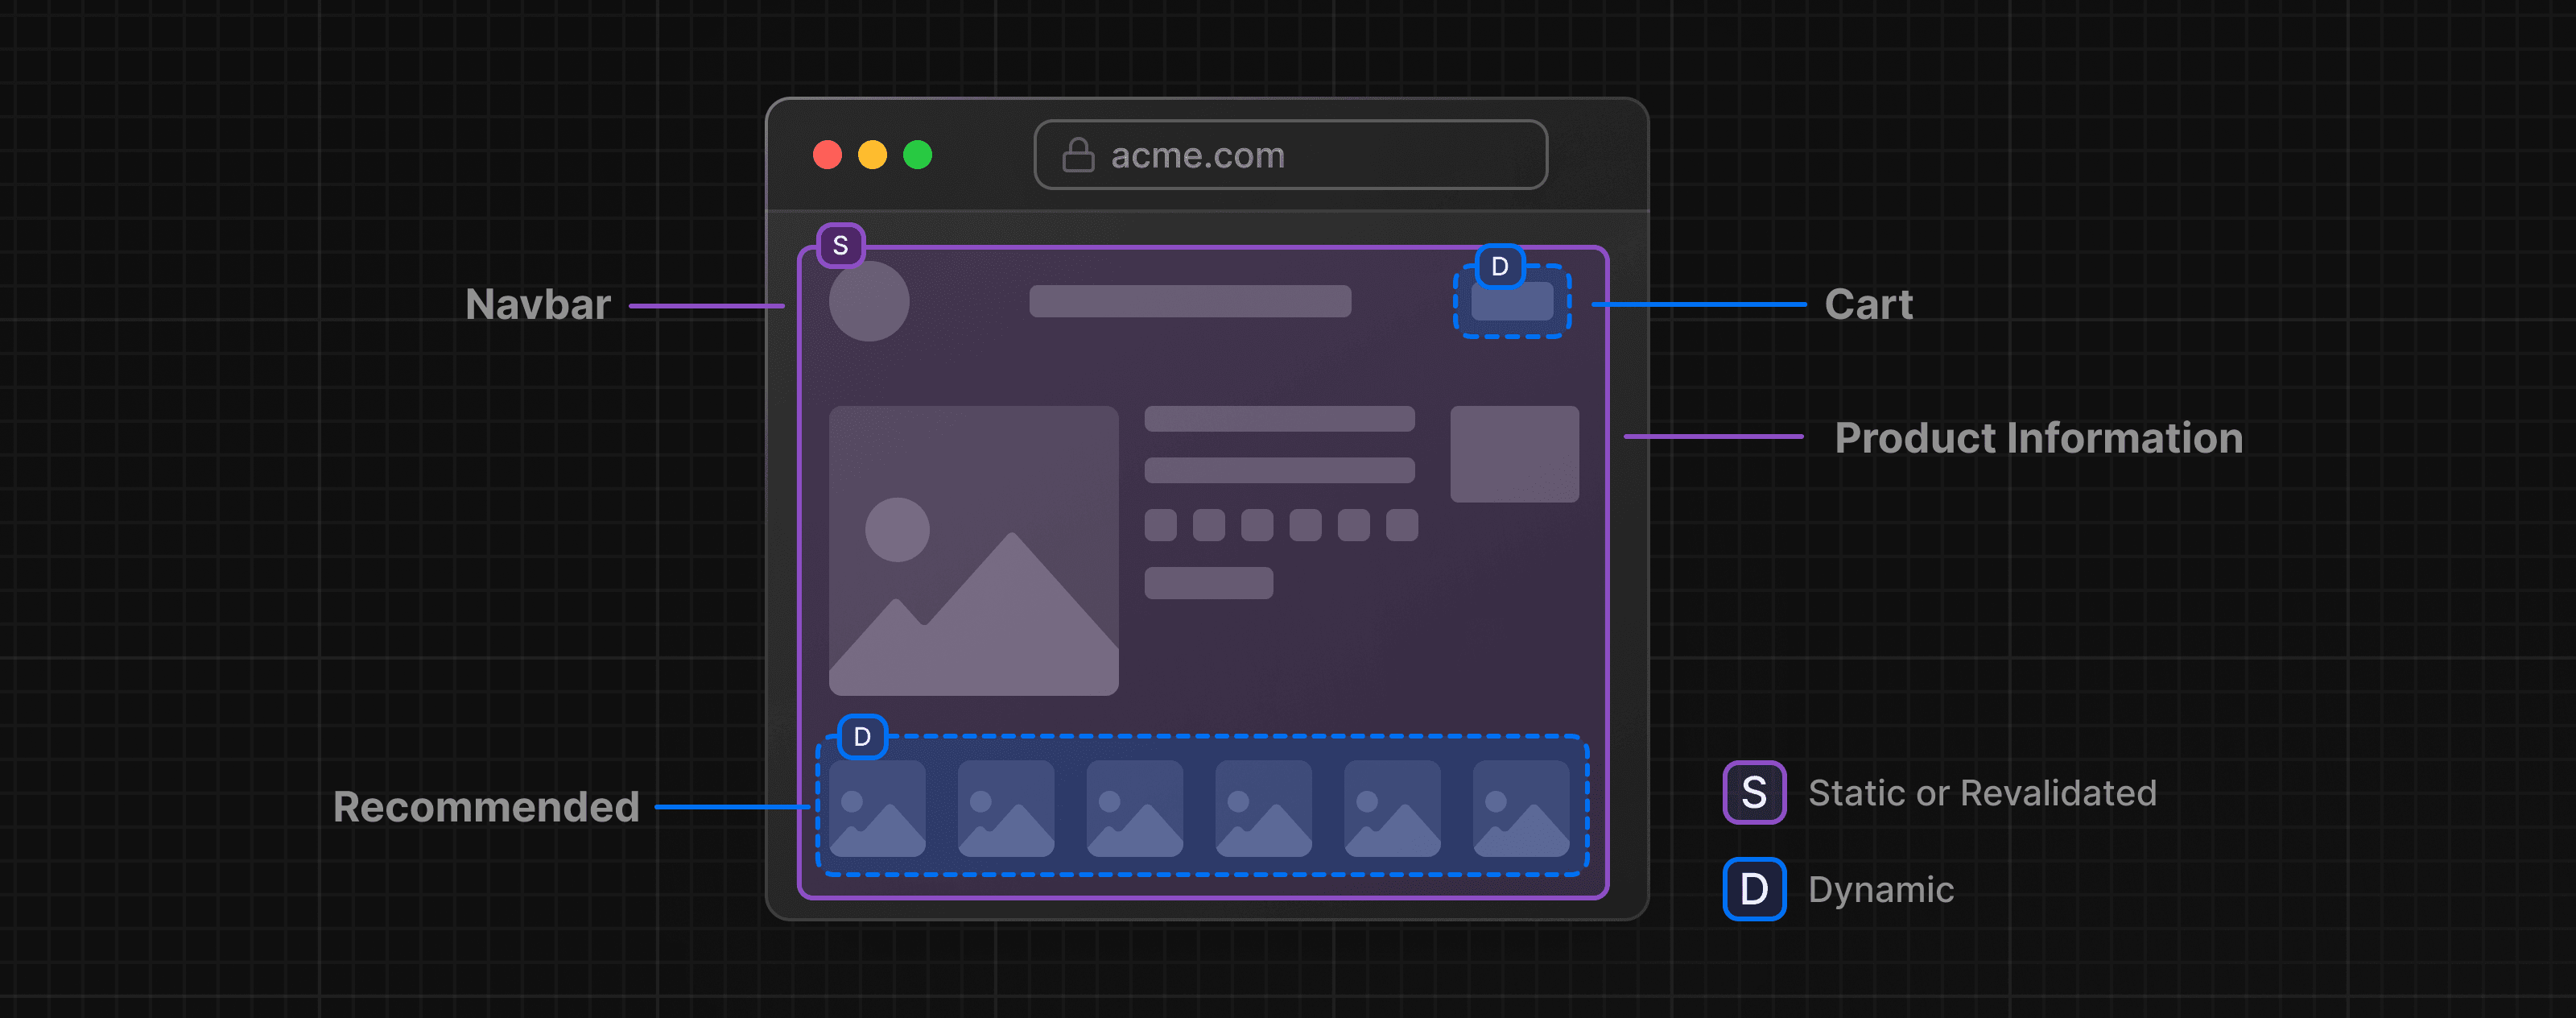
However, most routes are not fully static or dynamic. For example, consider an ecommerce site. You might want to statically render the majority of the product information page, but you may want to fetch the user's cart and recommended products dynamically, this allows you to show personalized content to your users.
Going back to your dashboard page, what components would you consider static vs. dynamic?
Once you're ready, click the button below to see how we would split the dashboard route:
What is Partial Prerendering?
Next.js 14 introduced an experimental version of Partial Prerendering – a new rendering model that allows you to combine the benefits of static and dynamic rendering in the same route. For example:

When a user visits a route:
- A static route shell that includes the navbar and product information is served, ensuring a fast initial load.
- The shell leaves holes where dynamic content like the cart and recommended products will load in asynchronously.
- The async holes are streamed in parallel, reducing the overall load time of the page.
How does Partial Prerendering work?
Partial Prerendering uses React's Suspense (which you learned about in the previous chapter) to defer rendering parts of your application until some condition is met (e.g. data is loaded).
The Suspense fallback is embedded into the initial HTML file along with the static content. At build time (or during revalidation), the static content is prerendered to create a static shell. The rendering of dynamic content is postponed until the user requests the route.
Wrapping a component in Suspense doesn't make the component itself dynamic, but rather Suspense is used as a boundary between your static and dynamic code.
Let's see how you can implement PPR in your dashboard route.
Implementing Partial Prerendering
Enable PPR for your Next.js app by adding the ppr option to your next.config.ts file:
import type { NextConfig } from 'next';

const nextConfig: NextConfig = {
  experimental: {
    ppr: 'incremental'
  }
};

export default nextConfig;
The 'incremental' value allows you to adopt PPR for specific routes.
Next, add the experimental_ppr segment config option to your dashboard layout:
import SideNav from '@/app/ui/dashboard/sidenav';

export const experimental_ppr = true;

// ...
That's it. You may not see a difference in your application in development, but you should notice a performance improvement in production. Next.js will prerender the static parts of your route and defer the dynamic parts until the user requests them.
The great thing about Partial Prerendering is that you don't need to change your code to use it. As long as you're using Suspense to wrap the dynamic parts of your route, Next.js will know which parts of your route are static and which are dynamic.
We believe PPR has the potential to become the default rendering model for web applications, bringing together the best of static site and dynamic rendering. However, it is still experimental. We hope to stabilize it in the future and make it the default way of building with Next.js.
You can now revert these changes and move on to the next chapter.
Summary
To recap, you've done a few things to optimize data fetching in your application so far:
- Created a database in the same region as your application code to reduce latency between your server and database.
- Fetched data on the server with React Server Components. This allows you to keep expensive data fetches and logic on the server, reduces the client-side JavaScript bundle, and prevents your database secrets from being exposed to the client.
- Used SQL to only fetch the data you needed, reducing the amount of data transferred for each request and the amount of JavaScript needed to transform the data in-memory.
- Parallelize data fetching with JavaScript - where it made sense to do so.
- Implemented Streaming to prevent slow data requests from blocking your whole page, and to allow the user to start interacting with the UI without waiting for everything to load.
- Move data fetching down to the components that need it, thus isolating which parts of your routes should be dynamic.
In the next chapter, we'll look at two common patterns you might need to implement when fetching data: search and pagination.
You've Completed Chapter 10
You've learned about Partial Prerendering, a new rendering model introduced in Next.js 14.
Next Up
11: Adding Search and Pagination
Learn how to implement search and pagination with Next.js APIs.
Was this helpful?
