12
Chapter 12
Mutating Data
In the previous chapter, you implemented search and pagination using URL Search Params and Next.js APIs. Let's continue working on the Invoices page by adding the ability to create, update, and delete invoices!
In this chapter...
Here are the topics we’ll cover
What React Server Actions are and how to use them to mutate data.
How to work with forms and Server Components.
Best practices for working with the native formData object, including type validation.
How to revalidate the client cache using the revalidatePath API.
How to create dynamic route segments with specific IDs.
What are Server Actions?
React Server Actions allow you to run asynchronous code directly on the server. They eliminate the need to create API endpoints to mutate your data. Instead, you write asynchronous functions that execute on the server and can be invoked from your Client or Server Components.
Security is a top priority for web applications, as they can be vulnerable to various threats. This is where Server Actions come in. They offer an effective security solution, protecting against different types of attacks, securing your data, and ensuring authorized access. Server Actions achieve this through techniques like POST requests, encrypted closures, strict input checks, error message hashing, and host restrictions, all working together to significantly enhance your app's safety.
Using forms with Server Actions
In React, you can use the action attribute in the <form> element to invoke actions. The action will automatically receive the native FormData object, containing the captured data.
For example:
// Server Component
export default function Page() {
  // Action
  async function create(formData: FormData) {
    'use server';

    // Logic to mutate data...
  }

  // Invoke the action using the "action" attribute
  return <form action={create}>...</form>;
}
An advantage of invoking a Server Action within a Server Component is progressive enhancement - forms work even if JavaScript is disabled on the client.
Next.js with Server Actions
Server Actions are also deeply integrated with Next.js caching. When a form is submitted through a Server Action, not only can you use the action to mutate data, but you can also revalidate the associated cache using APIs like revalidatePath and revalidateTag.
Let's see how it all works together!
Creating an invoice
Here are the steps you'll take to create a new invoice:
- Create a form to capture the user's input.
- Create a Server Action and invoke it from the form.
- Inside your Server Action, extract the data from the
formDataobject. - Validate and prepare the data to be inserted into your database.
- Insert the data and handle any errors.
- Revalidate the cache and redirect the user back to invoices page.
1. Create a new route and form
To start, inside the /invoices folder, add a new route segment called /create with a page.tsx file:


You'll be using this route to create new invoices. Inside your page.tsx file, paste the following code, then spend some time studying it:
import Form from '@/app/ui/invoices/create-form';
import Breadcrumbs from '@/app/ui/invoices/breadcrumbs';
import { fetchCustomers } from '@/app/lib/data';

export default async function Page() {
  const customers = await fetchCustomers();

  return (
    <main>
      <Breadcrumbs
        breadcrumbs={[
          { label: 'Invoices', href: '/dashboard/invoices' },
          {
            label: 'Create Invoice',
            href: '/dashboard/invoices/create',
            active: true,
          },
        ]}
      />
      <Form customers={customers} />
    </main>
  );
}
Your page is a Server Component that fetches customers and passes it to the <Form> component. To save time, we've already created the <Form> component for you.
Navigate to the <Form> component, and you'll see that the form:
- Has one
<select>(dropdown) element with a list of customers. - Has one
<input>element for the amount withtype="number". - Has two
<input>elements for the status withtype="radio". - Has one button with
type="submit".
On http://localhost:3000/dashboard/invoices/create, you should see the following UI:


2. Create a Server Action
Great, now let's create a Server Action that is going to be called when the form is submitted.
Navigate to your lib directory and create a new file named actions.ts. At the top of this file, add the React use server directive:
'use server';By adding the 'use server', you mark all the exported functions within the file as server functions. These server functions can then be imported into Client and Server components, making them extremely versatile.
You can also write Server Actions directly inside Server Components by adding "use server" inside the action. But for this course, we'll keep them all organized in a separate file.
In your actions.ts file, create a new async function that accepts formData:
'use server';

export async function createInvoice(formData: FormData) {}
Then, in your <Form> component, import the createInvoice from your actions.ts file. Add a action attribute to the <form> element, and call the createInvoice action.
import { customerField } from '@/app/lib/definitions';
import Link from 'next/link';
import {
  CheckIcon,
  ClockIcon,
  CurrencyDollarIcon,
  UserCircleIcon,
} from '@heroicons/react/24/outline';
import { Button } from '@/app/ui/button';
import { createInvoice } from '@/app/lib/actions';

export default function Form({
  customers,
}: {
  customers: customerField[];
}) {
  return (
    <form action={createInvoice}>
      // ...
  )
}
Good to know: In HTML, you'd pass a URL to the
actionattribute. This URL would be the destination where your form data should be submitted (usually an API endpoint).However, in React, the
actionattribute is considered a special prop - meaning React builds on top of it to allow actions to be invoked.Behind the scenes, Server Actions create a
POSTAPI endpoint. This is why you don't need to create API endpoints manually when using Server Actions.
3. Extract the data from formData
Back in your actions.ts file, you'll need to extract the values of formData, there are a couple of methods you can use. For this example, let's use the .get(name) method.
'use server';

export async function createInvoice(formData: FormData) {
  const rawFormData = {
    customerId: formData.get('customerId'),
    amount: formData.get('amount'),
    status: formData.get('status'),
  };
  // Test it out:
  console.log(rawFormData);
}
Tip: If you're working with forms that have many fields, you may want to consider using the
entries()method with JavaScript'sObject.fromEntries(). For example:
const rawFormData = Object.fromEntries(formData.entries())
To check everything is connected correctly, go ahead and try out the form. After submitting, you should see the data you just entered into the form logged in your terminal.
Now that your data is in the shape of an object, it'll be much easier to work with.
4. Validate and prepare the data
Before sending the form data to your database, you want to ensure it's in the correct format and with the correct types. If you remember from earlier in the course, your invoices table expects data in the following format:
export type Invoice = {
  id: string; // Will be created on the database
  customer_id: string;
  amount: number; // Stored in cents
  status: 'pending' | 'paid';
  date: string;
};
So far, you only have the customer_id, amount, and status from the form.
Type validation and coercion
It's important to validate that the data from your form aligns with the expected types in your database. For instance, if you add a console.log inside your action:
console.log(typeof rawFormData.amount);You'll notice that amount is of type string and not number. This is because input elements with type="number" actually return a string, not a number!
To handle type validation, you have a few options. While you can manually validate types, using a type validation library can save you time and effort. For your example, we'll use Zod, a TypeScript-first validation library that can simplify this task for you.
In your actions.ts file, import Zod and define a schema that matches the shape of your form object. This schema will validate the formData before saving it to a database.
'use server';

import { z } from 'zod';

const FormSchema = z.object({
  id: z.string(),
  customerId: z.string(),
  amount: z.coerce.number(),
  status: z.enum(['pending', 'paid']),
  date: z.string(),
});

const CreateInvoice = FormSchema.omit({ id: true, date: true });

export async function createInvoice(formData: FormData) {
  // ...
}
The amount field is specifically set to coerce (change) from a string to a number while also validating its type.
You can then pass your rawFormData to CreateInvoice to validate the types:
// ...
export async function createInvoice(formData: FormData) {
  const { customerId, amount, status } = CreateInvoice.parse({
    customerId: formData.get('customerId'),
    amount: formData.get('amount'),
    status: formData.get('status'),
  });
}
Storing values in cents
It's usually good practice to store monetary values in cents in your database to eliminate JavaScript floating-point errors and ensure greater accuracy.
Let's convert the amount into cents:
// ...
export async function createInvoice(formData: FormData) {
  const { customerId, amount, status } = CreateInvoice.parse({
    customerId: formData.get('customerId'),
    amount: formData.get('amount'),
    status: formData.get('status'),
  });
  const amountInCents = amount * 100;
}
Creating new dates
Finally, let's create a new date with the format "YYYY-MM-DD" for the invoice's creation date:
// ...
export async function createInvoice(formData: FormData) {
  const { customerId, amount, status } = CreateInvoice.parse({
    customerId: formData.get('customerId'),
    amount: formData.get('amount'),
    status: formData.get('status'),
  });
  const amountInCents = amount * 100;
  const date = new Date().toISOString().split('T')[0];
}
5. Inserting the data into your database
Now that you have all the values you need for your database, you can create an SQL query to insert the new invoice into your database and pass in the variables:
import { z } from 'zod';
import { sql } from '@vercel/postgres';

// ...

export async function createInvoice(formData: FormData) {
  const { customerId, amount, status } = CreateInvoice.parse({
    customerId: formData.get('customerId'),
    amount: formData.get('amount'),
    status: formData.get('status'),
  });
  const amountInCents = amount * 100;
  const date = new Date().toISOString().split('T')[0];

  await sql`
    INSERT INTO invoices (customer_id, amount, status, date)
    VALUES (${customerId}, ${amountInCents}, ${status}, ${date})
  `;
}
Right now, we're not handling any errors. We'll do it in the next chapter. For now, let's move on to the next step.
6. Revalidate and redirect
Next.js has a Client-side Router Cache that stores the route segments in the user's browser for a time. Along with prefetching, this cache ensures that users can quickly navigate between routes while reducing the number of requests made to the server.
Since you're updating the data displayed in the invoices route, you want to clear this cache and trigger a new request to the server. You can do this with the revalidatePath function from Next.js:
'use server';

import { z } from 'zod';
import { sql } from '@vercel/postgres';
import { revalidatePath } from 'next/cache';

// ...

export async function createInvoice(formData: FormData) {
  const { customerId, amount, status } = CreateInvoice.parse({
    customerId: formData.get('customerId'),
    amount: formData.get('amount'),
    status: formData.get('status'),
  });
  const amountInCents = amount * 100;
  const date = new Date().toISOString().split('T')[0];

  await sql`
    INSERT INTO invoices (customer_id, amount, status, date)
    VALUES (${customerId}, ${amountInCents}, ${status}, ${date})
  `;

  revalidatePath('/dashboard/invoices');
}
Once the database has been updated, the /dashboard/invoices path will be revalidated, and fresh data will be fetched from the server.
At this point, you also want to redirect the user back to the /dashboard/invoices page. You can do this with the redirect function from Next.js:
'use server';

import { z } from 'zod';
import { sql } from '@vercel/postgres';
import { revalidatePath } from 'next/cache';
import { redirect } from 'next/navigation';

// ...

export async function createInvoice(formData: FormData) {
  // ...

  revalidatePath('/dashboard/invoices');
  redirect('/dashboard/invoices');
}
Congratulations! You've just implemented your first Server Action. Test it out by adding a new invoice, if everything is working correctly:
- You should be redirected to the
/dashboard/invoicesroute on submission. - You should see the new invoice at the top of the table.
Updating an invoice
The updating invoice form is similar to the create an invoice form, except you'll need to pass the invoice id to update the record in your database. Let's see how you can get and pass the invoice id.
These are the steps you'll take to update an invoice:
- Create a new dynamic route segment with the invoice
id. - Read the invoice
idfrom the page params. - Fetch the specific invoice from your database.
- Pre-populate the form with the invoice data.
- Update the invoice data in your database.
1. Create a Dynamic Route Segment with the invoice id
Next.js allows you to create Dynamic Route Segments when you don't know the exact segment name and want to create routes based on data. This could be blog post titles, product pages, etc. You can create dynamic route segments by wrapping a folder's name in square brackets. For example, [id], [post] or [slug].
In your /invoices folder, create a new dynamic route called [id], then a new route called edit with a page.tsx file. Your file structure should look like this:
![Invoices folder with a nested [id] folder, and an edit folder inside it](/_next/image?url=%2Flearn%2Flight%2Fedit-invoice-route.png&w=3840&q=75)
![Invoices folder with a nested [id] folder, and an edit folder inside it](/_next/image?url=%2Flearn%2Fdark%2Fedit-invoice-route.png&w=3840&q=75)
In your <Table> component, notice there's a <UpdateInvoice /> button that receives the invoice's id from the table records.
export default async function InvoicesTable({
  query,
  currentPage,
}: {
  query: string;
  currentPage: number;
}) {
  return (
    // ...
    <td className="flex justify-end gap-2 whitespace-nowrap px-6 py-4 text-sm">
      <UpdateInvoice id={invoice.id} />
      <DeleteInvoice id={invoice.id} />
    </td>
    // ...
  );
}
Navigate to your <UpdateInvoice /> component, and update the href of the Link to accept the id prop. You can use template literals to link to a dynamic route segment:
import { PencilIcon, PlusIcon, TrashIcon } from '@heroicons/react/24/outline';
import Link from 'next/link';

// ...

export function UpdateInvoice({ id }: { id: string }) {
  return (
    <Link
      href={`/dashboard/invoices/${id}/edit`}
      className="rounded-md border p-2 hover:bg-gray-100"
    >
      <PencilIcon className="w-5" />
    </Link>
  );
}
2. Read the invoice id from page params
Back on your <Page> component, paste the following code:
import Form from '@/app/ui/invoices/edit-form';
import Breadcrumbs from '@/app/ui/invoices/breadcrumbs';
import { fetchCustomers } from '@/app/lib/data';

export default async function Page() {
  return (
    <main>
      <Breadcrumbs
        breadcrumbs={[
          { label: 'Invoices', href: '/dashboard/invoices' },
          {
            label: 'Edit Invoice',
            href: `/dashboard/invoices/${id}/edit`,
            active: true,
          },
        ]}
      />
      <Form invoice={invoice} customers={customers} />
    </main>
  );
}
Notice how it's similar to your /create invoice page, except it imports a different form (from the edit-form.tsx file). This form should be pre-populated with a defaultValue for the customer's name, invoice amount, and status. To pre-populate the form fields, you need to fetch the specific invoice using id.
In addition to searchParams, page components also accept a prop called params which you can use to access the id. Update your <Page> component to receive the prop:
import Form from '@/app/ui/invoices/edit-form';
import Breadcrumbs from '@/app/ui/invoices/breadcrumbs';
import { fetchCustomers } from '@/app/lib/data';

export default async function Page({ params }: { params: { id: string } }) {
  const id = params.id;
  // ...
}
3. Fetch the specific invoice
Then:
- Import a new function called
fetchInvoiceByIdand pass theidas an argument. - Import
fetchCustomersto fetch the customer names for the dropdown.
You can use Promise.all to fetch both the invoice and customers in parallel:
import Form from '@/app/ui/invoices/edit-form';
import Breadcrumbs from '@/app/ui/invoices/breadcrumbs';
import { fetchInvoiceById, fetchCustomers } from '@/app/lib/data';

export default async function Page({ params }: { params: { id: string } }) {
  const id = params.id;
  const [invoice, customers] = await Promise.all([
    fetchInvoiceById(id),
    fetchCustomers(),
  ]);
  // ...
}
You will see a temporary TS error for the invoice prop in your terminal because invoice could be potentially undefined. Don't worry about it for now, you'll resolve it in the next chapter when you add error handling.
Great! Now, test that everything is wired correctly. Visit http://localhost:3000/dashboard/invoices and click on the Pencil icon to edit an invoice. After navigation, you should see a form that is pre-populated with the invoice details:
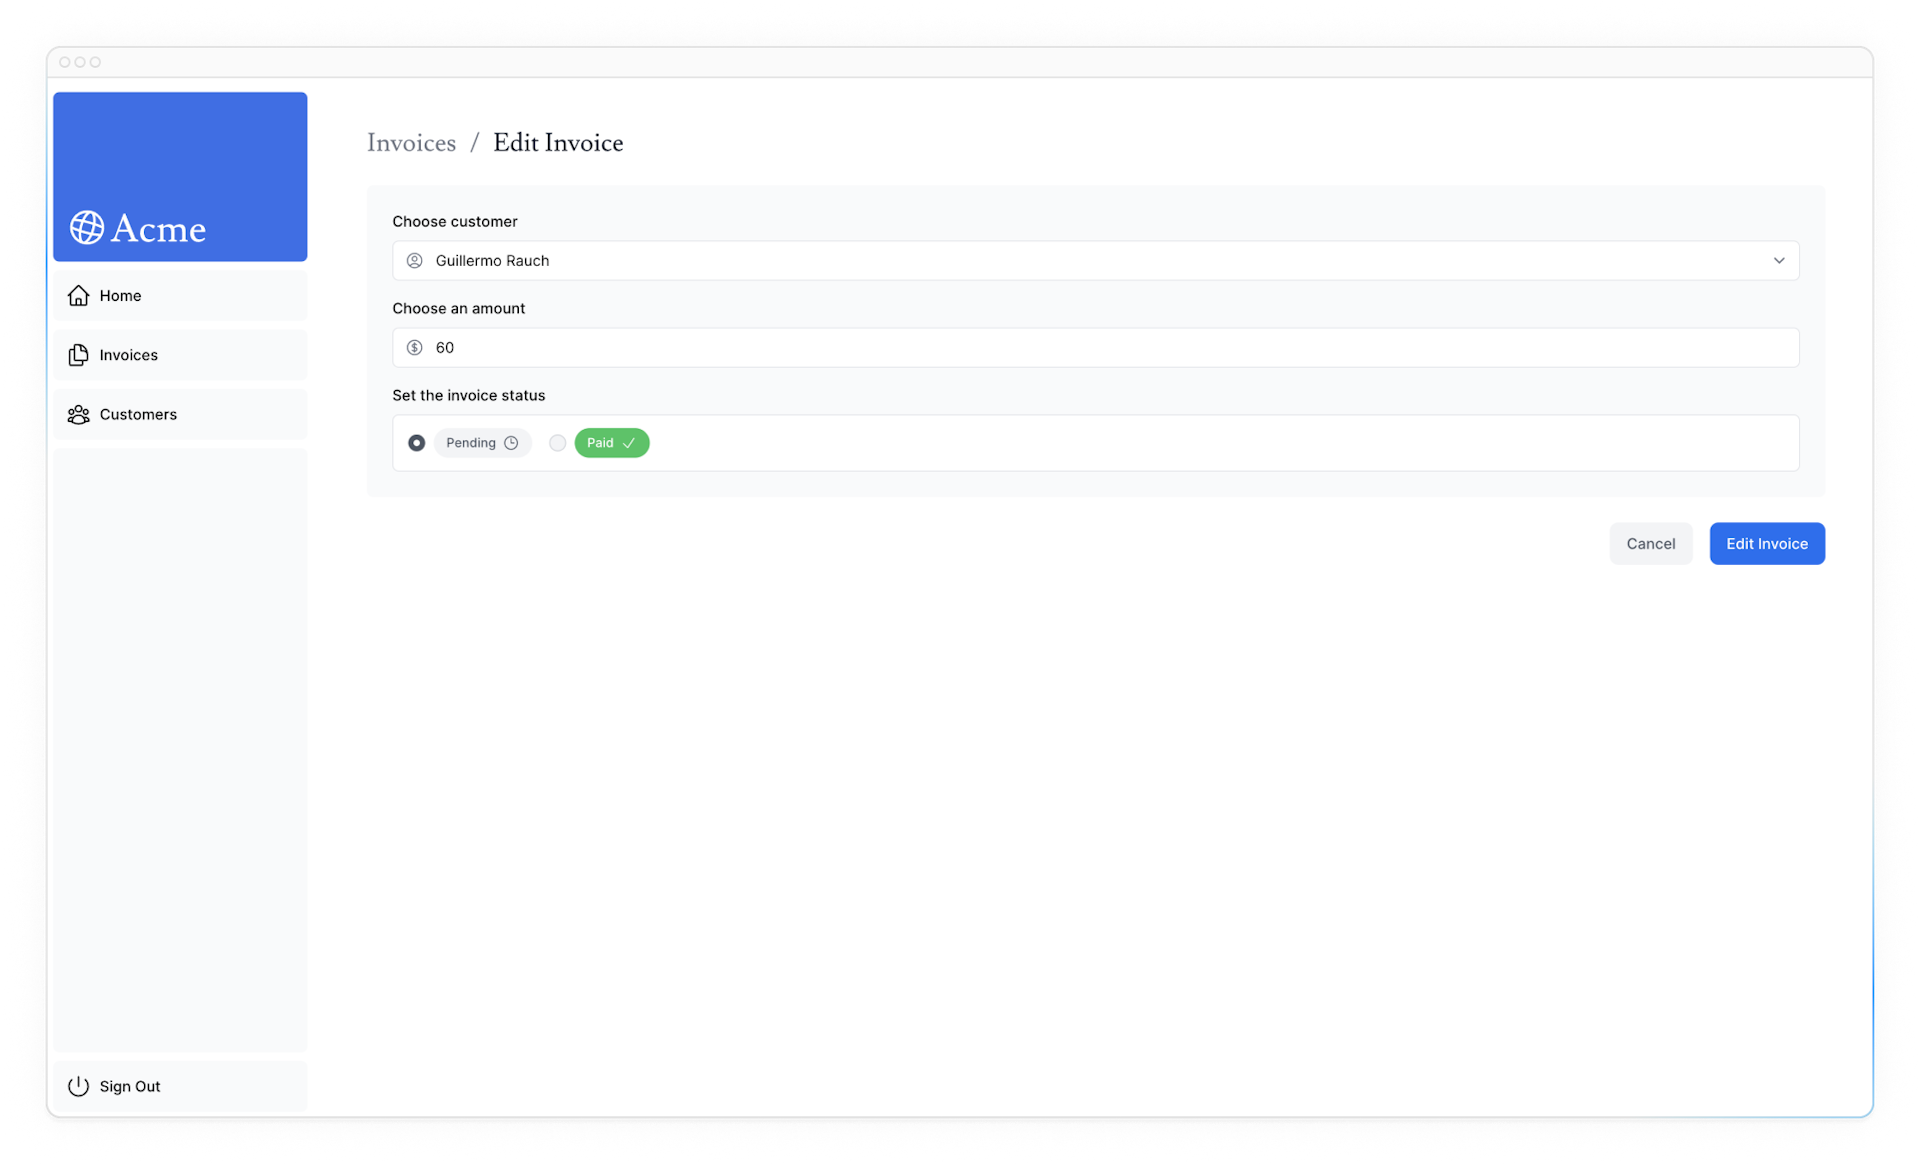

The URL should also be updated with an id as follows: http://localhost:3000/dashboard/invoice/uuid/edit
UUIDs vs. Auto-incrementing Keys
We use UUIDs instead of incrementing keys (e.g., 1, 2, 3, etc.). This makes the URL longer; however, UUIDs eliminate the risk of ID collision, are globally unique, and reduce the risk of enumeration attacks - making them ideal for large databases.
However, if you prefer cleaner URLs, you might prefer to use auto-incrementing keys.
4. Pass the id to the Server Action
Lastly, you want to pass the id to the Server Action so you can update the right record in your database. You cannot pass the id as an argument like so:
// Passing an id as argument won't work
<form action={updateInvoice(id)}>
Instead, you can pass id to the Server Action using JS bind. This will ensure that any values passed to the Server Action are encoded.
// ...
import { updateInvoice } from '@/app/lib/actions';

export default function EditInvoiceForm({
  invoice,
  customers,
}: {
  invoice: InvoiceForm;
  customers: CustomerField[];
}) {
  const updateInvoiceWithId = updateInvoice.bind(null, invoice.id);

  return (
    <form action={updateInvoiceWithId}>
      <input type="hidden" name="id" value={invoice.id} />
    </form>
  );
}
Note: Using a hidden input field in your form also works (e.g.
<input type="hidden" name="id" value={invoice.id} />). However, the values will appear as full text in the HTML source, which is not ideal for sensitive data like IDs.
Then, in your actions.ts file, create a new action, updateInvoice:
// Use Zod to update the expected types
const UpdateInvoice = FormSchema.omit({ id: true, date: true });

// ...

export async function updateInvoice(id: string, formData: FormData) {
  const { customerId, amount, status } = UpdateInvoice.parse({
    customerId: formData.get('customerId'),
    amount: formData.get('amount'),
    status: formData.get('status'),
  });

  const amountInCents = amount * 100;

  await sql`
    UPDATE invoices
    SET customer_id = ${customerId}, amount = ${amountInCents}, status = ${status}
    WHERE id = ${id}
  `;

  revalidatePath('/dashboard/invoices');
  redirect('/dashboard/invoices');
}
Similarly to the createInvoice action, here you are:
- Extracting the data from
formData. - Validating the types with Zod.
- Converting the amount to cents.
- Passing the variables to your SQL query.
- Calling
revalidatePathto clear the client cache and make a new server request. - Calling
redirectto redirect the user to the invoice's page.
Test it out by editing an invoice. After submitting the form, you should be redirected to the invoices page, and the invoice should be updated.
Deleting an invoice
To delete an invoice using a Server Action, wrap the delete button in a <form> element and pass the id to the Server Action using bind:
import { deleteInvoice } from '@/app/lib/actions';

// ...

export function DeleteInvoice({ id }: { id: string }) {
  const deleteInvoiceWithId = deleteInvoice.bind(null, id);

  return (
    <form action={deleteInvoiceWithId}>
      <button className="rounded-md border p-2 hover:bg-gray-100">
        <span className="sr-only">Delete</span>
        <TrashIcon className="w-4" />
      </button>
    </form>
  );
}
Inside your actions.ts file, create a new action called deleteInvoice.
export async function deleteInvoice(id: string) {
  await sql`DELETE FROM invoices WHERE id = ${id}`;
  revalidatePath('/dashboard/invoices');
}
Since this action is being called in the /dashboard/invoices path, you don't need to call redirect. Calling revalidatePath will trigger a new server request and re-render the table.
Further reading
In this chapter, you learned how to use Server Actions to mutate data. You also learned how to use the revalidatePath API to revalidate the Next.js cache and redirect to redirect the user to a new page.
You can also read more about security with Server Actions for additional learning.
You've Completed Chapter 12
Congratulations! You learned how to mutate data using forms and React Server Actions.
Was this helpful?